
2 Ways to take screenshots or screenshots on iPhone – In today's smartphone users, it is very common to share anything, be it information, images, text or videos. And what we often share with our friends are screenshots or screenshots. However, for some people taking screenshots is not easy because they don't know how, especially for users of Apple products, namely the iPhone, this will be a little complicated.
It's a bit tricky because there are two different ways to take a screenshot or screenshot on iPhone. Which one you want to learn depends on the iPhone model you have, so you should know that before you proceed.
In this guide I will cover how exactly you can take a screenshot or screenshot on your iPhone on even the newest or old model iPhone. This way you can easily take a picture of any app or picture quickly on your screen while using your iPhone iOS device.
After taking a screenshot or screenshot on iPhone, you can send it through many apps using Share sheet on iOS, or add captions with text or 'Markup'. This is useful when you want to mark a specific area on an image or add some words for a specific context.
How to Take Screenshots or Screenshots on iPhone X and Beyond
If earlier iPhones relied on using the home button to take screenshots or screenshots, this setting has now been changed on modern iPhone versions.
This method is what you can use if you are an iPhone 11, iPhone 11 Pro, iPhone 11 Pro Max, iPhone XS, iPhone XS Max, iPhone XR or iPhone X user.
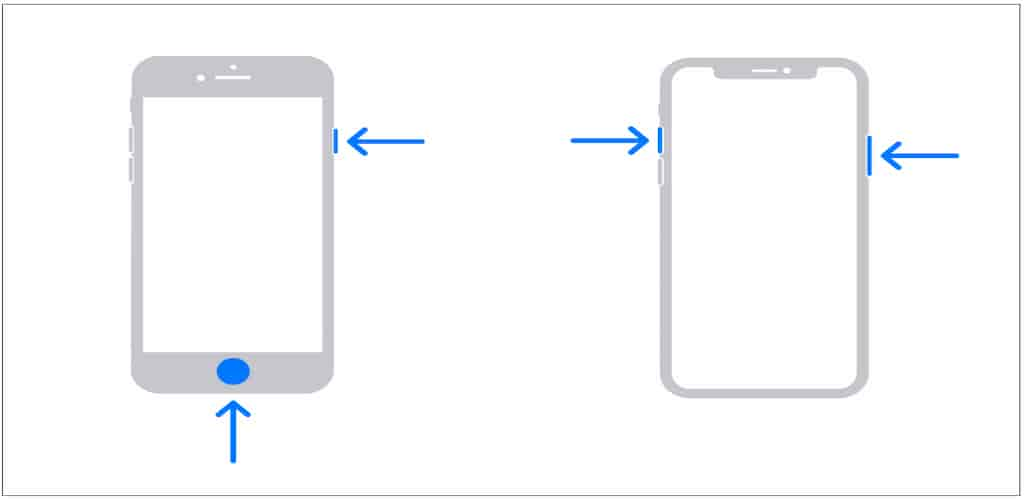
This way to take screenshots or screenshots on iPhone. Just press and hold the power/lock button (the button you use to turn your iPhone on or off) and the volume up button on the other side.
It will take a screenshot or screenshot and send a thumbnail image in the bottom corner of the screen. The screenshot or screenshot itself is automatically saved to Photos and the thumbnail or thumbnail will disappear after a few seconds, and the screenshot or screenshot you managed to capture will be saved to the Photos app.
You can tap the thumbnail to crop the screenshot or screenshot or cross it to your heart folder.
Then tap 'Done' in the top left corner when you're done editing and you'll be given the option to save the edited screenshot or screenshot to your Photos app (and Files on iOS 13), or the option to delete the screenshot or screenshot.
Of course, you can also share screenshots or screenshots – just hold the thumbnail to share the image via supported apps like iMessage, WhatsApp, Facebook or Twitter.
How to Take a Screenshot or Screenshot on Another iPhone
If you are using an older iPhone or iPhone SE 2020, you will have to use a different method. This applies to devices like the iPhone 8, iPhone 7 and even the iPod Touch.
To take a screenshot or screenshot on a device that has a Touch ID button, hold down the top button (or the side button, depending on your device) and simultaneously press the home button at the bottom of the screen. And you have successfully taken a screenshot or screenshot.

As with newer iPhone models, you can add images and text by tapping the thumbnail that appears, or share the image as it is by long-pressing on the thumbnail.
And those are two ways that you can do to take screenshots on the latest iOS smartphone devices or older versions. Hopefully this article is useful and good luck.
.jpg)
.jpg)
.jpg)